This time in the IT class, we need to create a program book which the book. Three persons in one group. We can create a program book by using Microsoft Word. The program book that we plan to create which is half of A4 size which mean we are going to fold the A4 paper into half. If you think that it is difficult to decide which page should come first or found difficulty when printing, there is a setting in Microsoft Word can help you solve all this problems.
First, click on ‘File’ which you can find this on the left upper part. Then, click on ‘Page Setup’. In the Page Setup, in the column of multiple pages, change ‘Normal’ into ‘Book Fold’. After choosing it, the orientation of the page will automatically change into landscape. You can also set your margin to be narrower so that you can fit more things in your book fold. After all the setting, remember to click ‘ok’ to complete your setting.
  Then, you can start to create your program book and insert text. The program for my program book is a “Program Khidmat Bakti” which is a visiting to a village and give community services to the people in the village. We did create a front cover for our program book. Besides, the content of our program book include speech from the vice chancellor, speech from the head of the department, speech from the president of the program, introduction and objective of the program, the schedule of the program, the organization of the committee members and many more.
Tuesday, March 31, 2009
Ways to create a program book by using Word...
Posted by Lee Fang Jo at 3:59 PM 0 comments
Friday, March 13, 2009
Ways to create a brochure...
This time, we were asked to create a brochure. How to create it? It is simple and easy to create a brochure. You can use Microsoft Word to create a brochure. Your brochure is basically just two landscape oriented pages set up with three columns. But before starting to create a brochure, you should try to create a brochure using a paper. By using a paper, you will have a brief idea about how your brochure will look like and how you should you fold your brochure. After deciding how your brochure going to look like, you an start to create it using Word.
1. Figure your layout
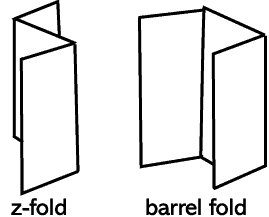
Before you open Word, you should figure out how the panels of your brochure will appear on the paper. There are two types of folds commonly used in brochures: the z (or accordion) fold and the barrel (or roll) fold. As the name indicates, with a z-fold, the paper is folded in alternating directions, which is good if you want to present information sequentially. The barrel fold is much like you'd fold a letter before putting it in an envelope (the second fold wraps around the first one).
This time i choose to create my brochure in the form of barrel fold. Then you have to decide which is fold is your first page.

2. Set up your paper
You should change your page orientation to landscape. Then you can set up the margins of the paper which you think is suitable for your brochure. Then after all the setting, you can click 'OK'. Next, in the page setup, click on the 'Paper' on the column above. This time, you are going to set up your paper size. There various size of paper that your can choose. But, i decided to choose A4 size paper which I think is not too big and not too small.
3. Set up columns
In order to let the brochure can fold into 3 parts, you have to set up the column into 3. Which mean that when you type your information in the paper, it will automatically start from the first column and continue to the second and third. This allow you to fold the paper into a brochure after you print it out.
4. Add and format text
Your layout is now all set up. You should see two pages that each have three panels with a blank paragraph in each one. Now you can begin adding text. Column break. When you are adding text, don't forget about where it will end up in the finished product. The cover may actually be the last panel (refer to your folded scrap piece of paper if you forget). Don't forget to create and design your cover of your brochure. You can format the text as you type or type it all in first and format later.
5. Add picture
The whole goal of any brochure is to communicate. Anything that is hard to read, won't be read. So in order to make your brochure to become interesting and easy to understand, you can add some pictures that are related in your brochure which can make your brochure colourful and attract others to read your brochure. It is important to make your brochure attractive in order to reach the goal of dissemination information to other. Brochure is a good and easy media to disseminate useful and important information.
6. Print it out
After you have done all the things, you can print your brochure out. But remember, must print it by using one paper only and both pages of that paper.
Posted by Lee Fang Jo at 2:25 PM 0 comments
